Showing posts with label nails. Show all posts

Sunday, 14 June 2015

10 Things To Do When You're Bored in The Summer

Hey everyone,

Today I thought I'd do a bit of a chatty/lifestyle blog post as I feel like writing as I haven't been on my blog for so long! So I know that summer holidays are coming up soon, so I thought i'd put this blog post together to share some ideas of what you can do when you're bored :D


Hope you enjoy :)

1. Start a project on your blog. If you haven't already....create a blog and start sharing what you do each day and enjoy interacting with others. Or..if you already have a blog, start a new series or project on it and set yourself the challenge of writing about something each day. It could be anything from what you eat to what makeup you wore...have fun with it :D

2. Practice your nail art. Why not get your nail polishes out and get creative! Look up inspiration and start coming up with new ideas on your nails, play around with colours you wouldn't use before and even look up and treat yourself to some new nail tools.


3. Decorate your room/reorganise it. Occupy yourself by changing up the layout of your bedroom or any room for that matter or even redecorate it. You could go and paint your room a different colour, swap out your bedding and cushions or just DIY some new things for your room. Look online for inspiration and pop into you local charity shops...imagine how to use objects for different reasons..e.g. use a cake stand for a jewellery holder :)


4. Experiment with photography. Why not use your camera or your camera on your phone to take pictures. Have fun with taking pictures of objects around your house or town and maybe even edit them? Even print them off and add them to an album or share online..on your blog.

5. Set yourself a challenge with only £10. Give yourself a budget of £10 and try and buy all the things for one project...could be ingredients for a cake...or paint for decorating or ornaments to decorate a section of your room.


6. Start organising with a planner. Introduce yourself to the world of decorating planners and buy your own. Collect and make your own washi tape, post-it notes and bookmarks to plan your life and make your usual planner look cute and personalised to your own style. 


7. Look for some ideas on Pinterest. I love to use Pinterest when i'm bored to search for new ideas and inspiration for any type of project. It could be anything from making a card to building a shed in your garden!


8. Try to create art. I personally love to paint, draw and sketch when i'm bored...so why not try it out, you don't have to be good at it, enjoy the process and even get your friends around to have a laugh and look at what each other have created!


9. Bake and decorate a cake. Use ingredients around your home and look up some recipes to bake a cake...then decorate it :) Take your time with it or have your friends and family time you to create a chosen design.


10. Get a new look. Change up the way you look...get a new haircut, try out a new makeup look and even try and buy a different style of clothes. Surprise your friends and family with your new look :D


Hope you enjoyed this post :) Let me know if you liked this style of blog post?


Twitter | Facebook| Instagram | Themed Instagram | Pinterest | Tumblr | Wanelo | Lockerz | Bloglovin

Tuesday, 11 November 2014

NOTD #6 --- Halloween inspired

Hey everyone,

Halloween has been and gone but I thought I'd share with you what I painted and decorated my nails with .... Since halloween counts as an excuse to wear dark vampy colours including lots of black, red and purple, I thought that I'd paint my nails with a deep red and add some black accents.

(of course before anything I always paint my nails with a coat of Nail Envy to prevent staining)

Then.. I painted my nails with the actual colour I would like to use which was this 'Rimmel London Lycra nail polish in 391 Celebrity bash:


♥ ♥ ♥

Then I added some black beads to each cuticle:


(they're all flatback and very easy to apply using tweasers)

♥ ♥ ♥

And to seal it all in I used another layer of OPI Nail Envy and sped up the drying process using my OPI drip drying drops:


And then this is what my nails looked like:


(excuse the bit of nail varnish on my skin, this was taken straight after painting them)

I hope you enjoyed this blog post...as always I really enjoyed writing it and making it...stay tuned for the next post and check out my links below: 


Monday, 25 August 2014

Makeup Social App

Hey everyone,

So I was contacted recently by the makers of the app 'Makeup Social' to do a review on their new iphone app. I had a look at it and tried it out and I'm going to share with you my 100% honest opinion about the app and if its easy to use, runs smoothly and what features I like and don't like about it :D

Unfortunately I don't have an iPhone, I have an Android, so I will be reviewing the app based on using it on my iPad, however they will be launching the Android version very soon! 

So the app is free from the itunes app store and it downloaded very quickly--- so that's a good start already!

This is what the icon looks like and what it looks like when you start the app:

♥

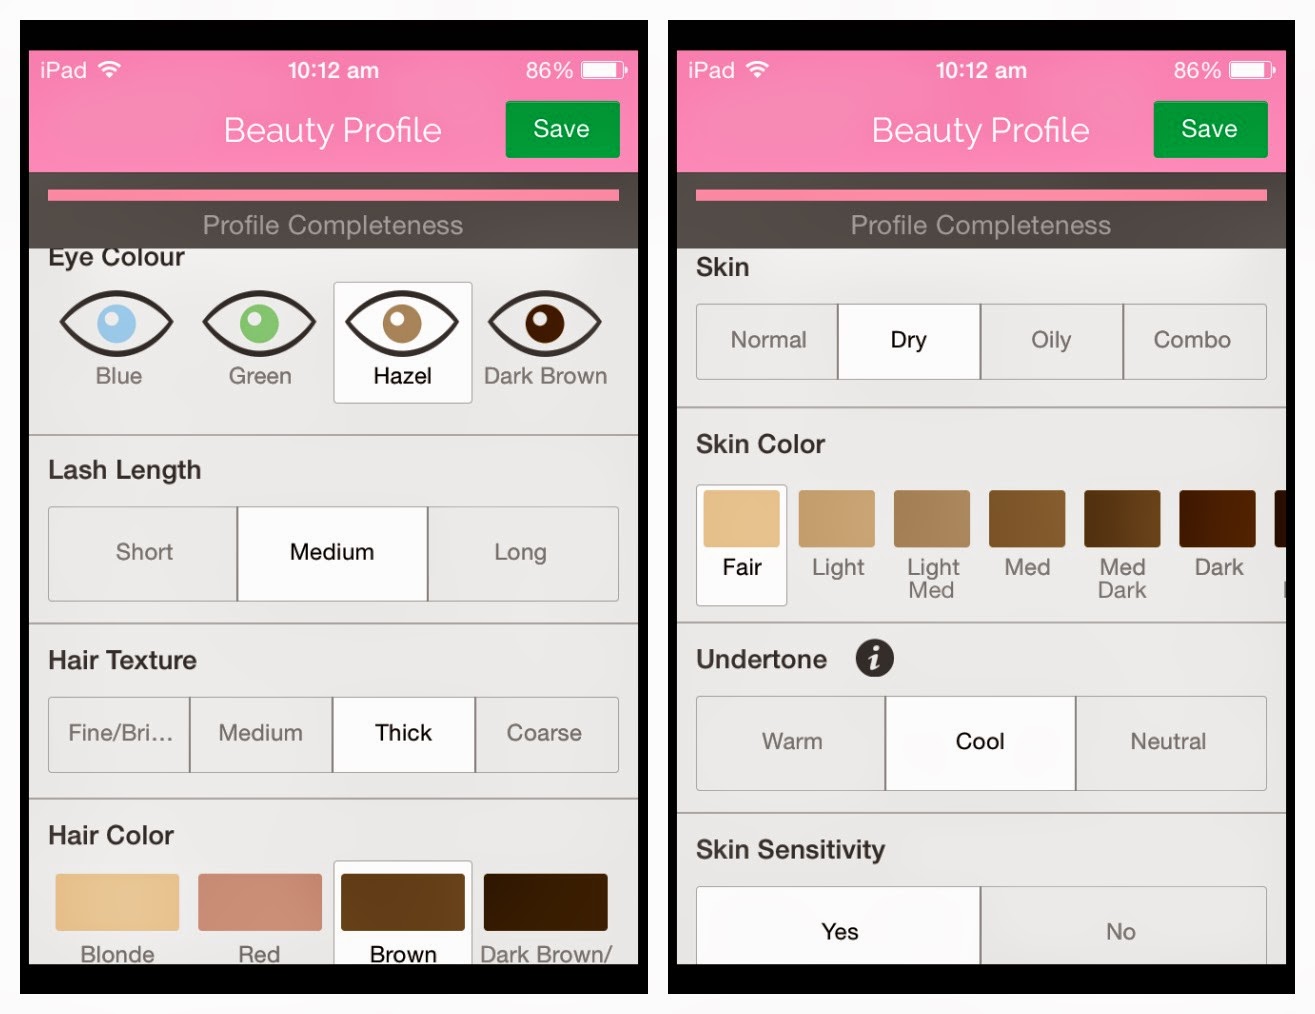
Then you can sign in if you have an account already from using their website or register which is what I did, to register you have to answer some simple questions about your eyes, skin, hair etc. and enter your birth date and gender.


♥

After you have done this, you can use the app and it should look like this: 


At the bottom you can see 5 different tabs, at the moment its on Feed where you can see what the people you are following are posting or what the latest posts are from everyone on the app.

♥

The next tab along is the Discover tab where you can look at the most popular posts including trending products people are talking about, trending photos and trending posts that people have written: 


♥

The next tab Add is where you can post pictures, written posts and reviews:


You can also connect Makeup Social to your facebook and twitter so that when you post it also posts to your facebook and twitter account.

♥

Then the next tab over to the right is where you can write and view people's reviews on any product you like:


♥

Then the last tab to the far right is where you can view your profile and notifications and also edit your profile:


So at first it will just have the questions you have answered and the username you have chosen so you can then customise it by changing your profile picture, adding some infomation about you and a link to your blog or instagram e.g. then click save :D

♥

After this is all setup which takes no time at all literally like 5 minutes you can start posting on the app and reading and looking at what other people are posting!


Above you can see I was commenting on peoples posts, adding reviews and liking pictures by double tapping.

♥
Problems

Overall the app is very quick and easy to use and is such a great idea for the beauty community. However, I did have a couple problems:

  • When posting one of my reviews it posted twice and I didn't know how to delete it..eventually I swiped left and figured you could delete it that way.
  • Also, when closing and opening the app again I had to click login again whereas I would prefer if it logged in automatically.
♥

Suggestion

I also had one suggestion, this may already be included on the app and I have just not seen it yet but it is something I would like to address:

  • There could be a walkthrough at the start of opening the app so that new users can figure out how to do stuff like delete posts etc. (and an option to skip this for those who want to )
♥

Overall I really enjoy using this app and its great for interacting with the beauty community and loads quickly and doesn't take up much room on your device!

I hope you enjoyed this post, it's something very different to what I normally do but was enjoyable to share my opinion with everyone.

See you in my next post :D (exciting)


My links:


*Disclaimer* I am not being paid to say things about this product and I will be sharing my 100% honest opinion. 

Sunday, 22 June 2014

NOTD #5 - OPI Alcatraz...Rocks Liquid sand ♥

Hey everyone, 

Today I thought I would write a post and show you how my nails are painted and what I used. I haven't painted my nails in such a long time but painted them around about last week and I'm very impressed by the longevity of my nail varnish and how they haven't chipped yet which they usually do. I fancied wearing a darker nail polish for a change even though we are in the summer and dark nails aren't that popular right now.

(pictures above were found on google)

♥ ♥ ♥

Below are what my nails look like after about a weeks wear. 


♥ ♥ ♥

I have quite a few nail varnishes that I don't use that often... this being one of them. I honestly don't know why I don't use it more often because I love the colour and the texture is very unique. 

If you were wondering... I got this as a Christmas present and it's from OPI... called 'Alcatraz...Rocks', its one of their liquid sand nail polishes. 

The texture of it once it has dried definitely feels although its been dipped in sand and is very rocky. I personally love this texture but if you didn't like it you could add a top coat which would even out this texture and create a smooth finish.

The colour of the nail varnish is also very pretty because in the sunlight as you can see to the left, their are tiny shimmers of blue and purple that look very pretty and make the dark nail varnish feminine. The colour itself is a mixture of many shimmers including gold, green and dark blue glitters. 

As mentioned before, this nail polish has really impressed me on how well it has lasted and not chipped. This may be due to it being a thicker texture but I would've thought that with bumps it would've chipped easier but that wasn't the case. 

I've looked up this nail polish online and you can get it for about £7 - £8 depending on which shop you are buying it from.


♥ ♥ ♥

Before I applied my nail varnish, I coated my nails with another nail polish from OPI which I have used for so long... their 'Nail Envy'.

Nail Envy acts as a food for your nails and hydrates them so any damage caused by removing old nail varnish is made healthy again. It also prevents nail polishes from staining and creates a smooth canvas for you to apply your colour on.

I've repurchased Nail Envy many times before and I got this one to the right from Christmas and it came in a set of three polishes. But you can buy it separately online or in shops for about £11 - £12. 

If you wanted to prevent nail polishes staining you could use any top coat or base coat that you have... it doesn't have to be expensive.


I hope you enjoyed this blog post... I'm really enjoying writing blog posts recently and changing the way I lay stuff out. Tweet me a picture of your nails at @fgeorgiaa or tell me below what you have on your nails at the moment...I would love to find some more nail polishes xx


My links:


Saturday, 8 February 2014

NOTD collab with Beautyandkatie ♥

Hey everyone, 

So this is a really exciting post for me... its my first collab blog post!
And its with the very pretty Katie from beautyandkatie.blogspot.co.uk 


We've been planning to do a collab for a long time now and here's the day which we get to share it with you lot! So we thought we'd both do a NOTD collab and share what we are both wearing on our nails...

Onto my nails...


So i've been loving painting my nails with colours that I don't often use... like greys and brighter colours... The colour which I have used is by Nails Inc and it's called 'Baker Street'.


I also used my Seche Vite Top Coat to seal the nail polish to make them shiny and last longer. I definitely recommend using the Seche Vite Top Coat because it drys your nail varnish so quickly!


I hope you enjoyed seeing what I have on my nails and enjoyed the collab... if you want to see Katie's blog post... click here!


My links:


Tuesday, 14 January 2014

Deborah Lippmann Best of Both Worlds Pop Rock Set

Hey everyone,

So lately I've really been enjoying posting regularly so today I thought I'd do another post and show you what I just received in the mail. 

I brought this on the lookfantastic website... here: http://www.lookfantastic.com/deborah-lippmann-best-of-both-worlds-pop-rock-set-limited-edition-2-x-8ml/10877367.html I'd recently seen this online and resist getting them! 


This is what it looks like in all of it's packaging... I brought this limited edition set for £17 from lookfantastic with free delivery which I thought was really good!

This is what the back of the packaging looks like...


I absolutely love the little bag it comes with:


The little bag is covered in mulit-coloured glitter with silver detailing. The only small downside about this packaging is that some of the glitter particles do come off but there is definitely enough glitter for it to stay sparkly!


Inside of the bag are two of Deborah Lippmann's Mini nail varnishes in the shades 'She Bop' and 'Happy Birthday'. 


The shade 'Happy Birthday' matches the small pouch and looks as if it contains the same glitter particles.

This is what 'Happy Birthday' looks like:


And the shade 'She Bop':


I hope you enjoyed this little post! Get the set whilst you can because it's gorgeous! Hopefully in the future I might paint my nails with the colours and show you some swatches :D


Links:

Friday, 8 November 2013

NOTD #4

Hey everyone, 

So I wasn't going to do a post today but I thought that I'd make one anyway to keep up with uploading daily...so in today's post, I'm going to show you my nails I painted for the week and what I used.


Lets get into it...


So this is what my nails looked like when they were done:


I always apply a base coat before any nail varnish, whatever the colour is so that it doesn't stain. I use OPI Nail Envy which gives a nice shine to your nails and also keeps then healthy because it 'feeds' them. 


 Then I applied 2 coats of the Kate Spade by Nails Inc nail polish in Uptown Glamour which is a lovely, metallic gold/brown colour. 


Then, I applied 2 coats of the OPI nail lacquer in Save Me to my ring finger over the top of the metallic gold/brown.


After all of this, I then applied the Seche Vite quick drying top coat to make the nail varnish last longer and to make them more shiny.


Thank you for reading, I hope that you enjoyed reading this post! :)


My Links: